Prepare the Analyzer
Prior to opening the emissions inspection on the analyzer, be sure to ask the customer the six questions previously outlined to determine if a smog is required. However, for an OBD-II test, the third question, How far have you driven this vehicle, is disregarded. OBD-II vehicles do not require preconditioning. The vehicle will be ready to test even if it has not yet reached operating temperature.
Remember, the other questions are: Why Do You Need the Smog? Have you recently purchased this vehicle and if so, was it a private party sale? What City do you live in? What County do you live in? What Zip Code is your address in?
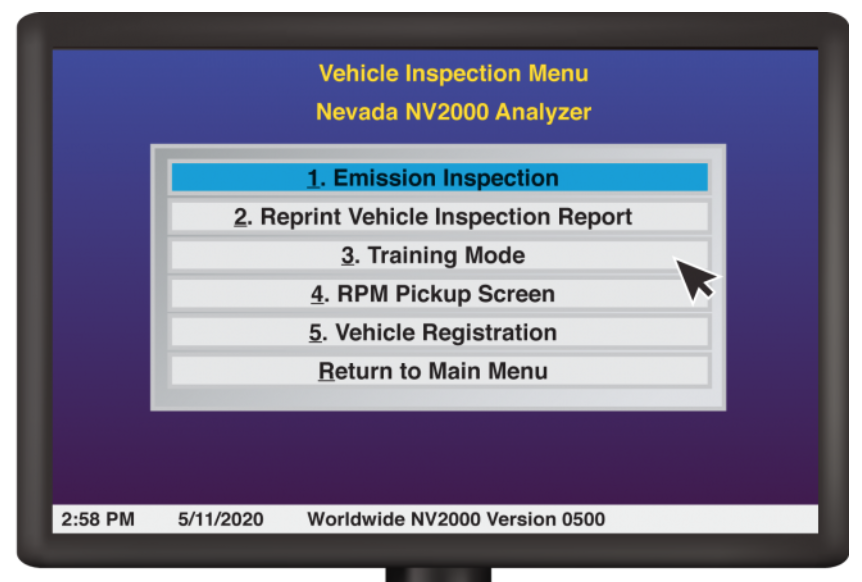
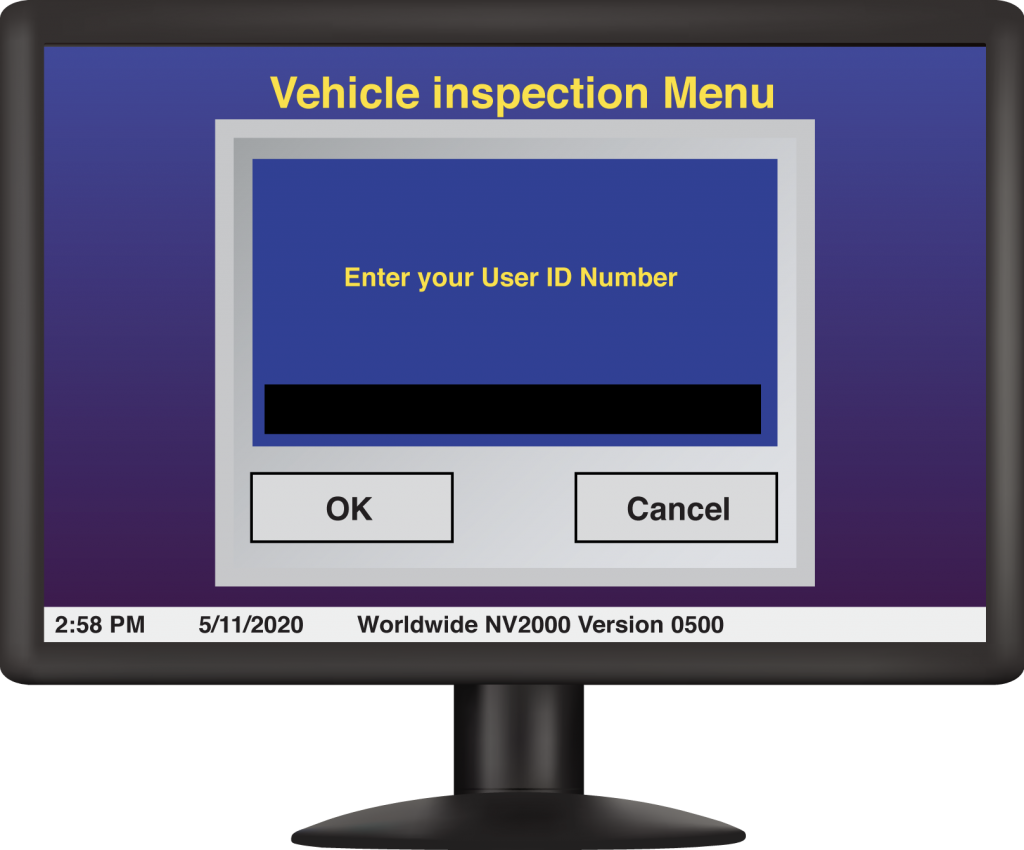
If the answers to the five questions indicate that a smog is required, open the Emissions Inspection page on the analyzer. This can be found under the Vehicle Inspection Menu, and is the same selection used for the tailpipe test. Upon selecting this option, the analyzer will prompt the inspector to login using their MEI number and password. Upon logging in, the next page will be the VIN entry page as during the tailpipe test.
The analyzer will prompt you to enter the Vehicle Identification Number for the vehicle being tested. Similar to the tailpipe test, you will either locate a scan bar and use the analyzer scan tool to input the VIN, or input the VIN manually using the keyboard. Again, when inputting the VIN manually, you will be asked to enter it a second time for confirmation. Be sure that both entries match and are accurate. Incorrect information will result in an invalid VIR and is the responsibility of the shop and the inspector. If an invalid VIR is issued, the customer will be unable to register their vehicle and the shop must issue a full refund or retest the vehicle at no cost.
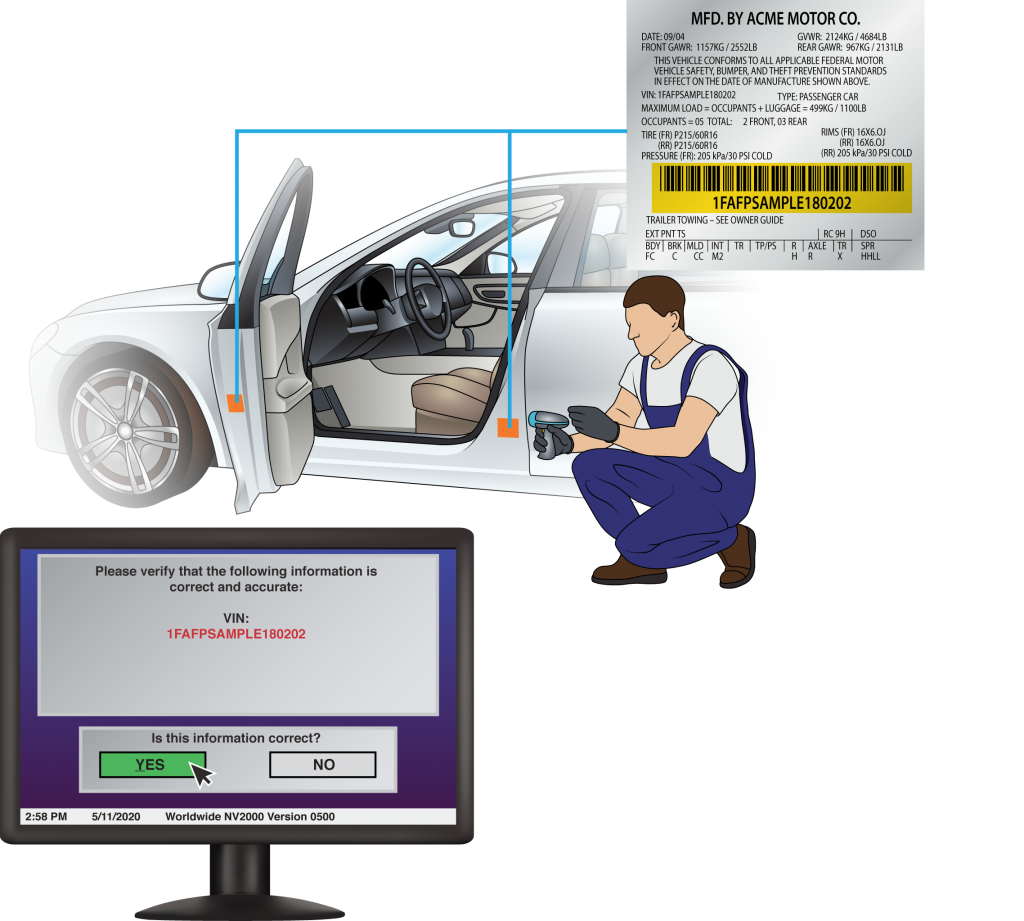
Always verify the VIN input against the number on the vehicle, even if using a scan tool. Sometimes a VIN will scan incorrectly. Also ensure that the VIN number on the vehicle is correct. If the vehicle information sticker or VIN plate on the dash appear to have been replaced (or if the body panel they are located on does not appear original to the vehicle), confirm the VIN number with a secondary VIN elsewhere on the vehicle. If you are unable to accurately identify the VIN, send the customer to the VIN inspection station at the DMV, not to the emissions lab. Once the VIN has been correctly input and verified, press the YES selection on the verification box to continue to the next screen.
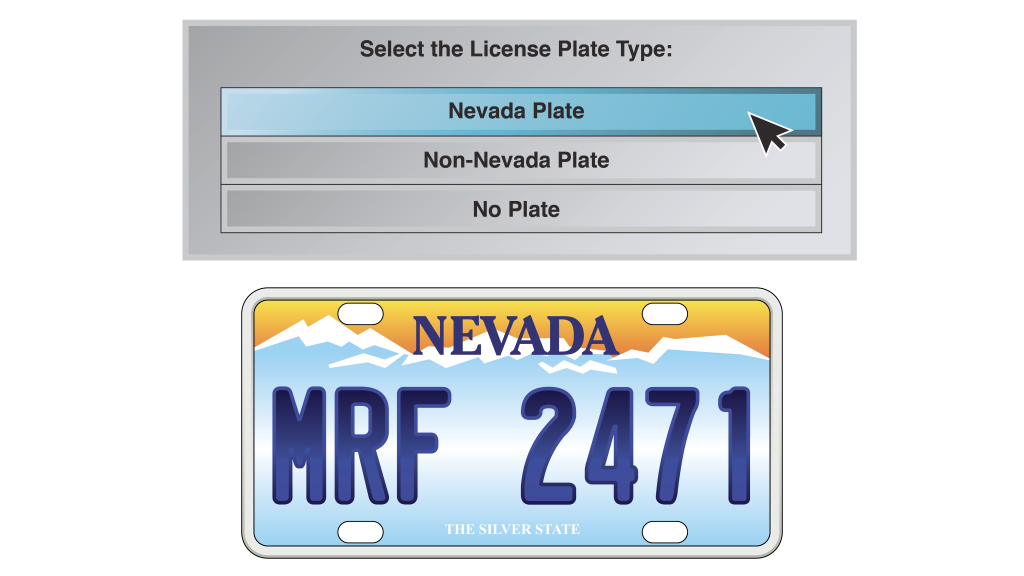
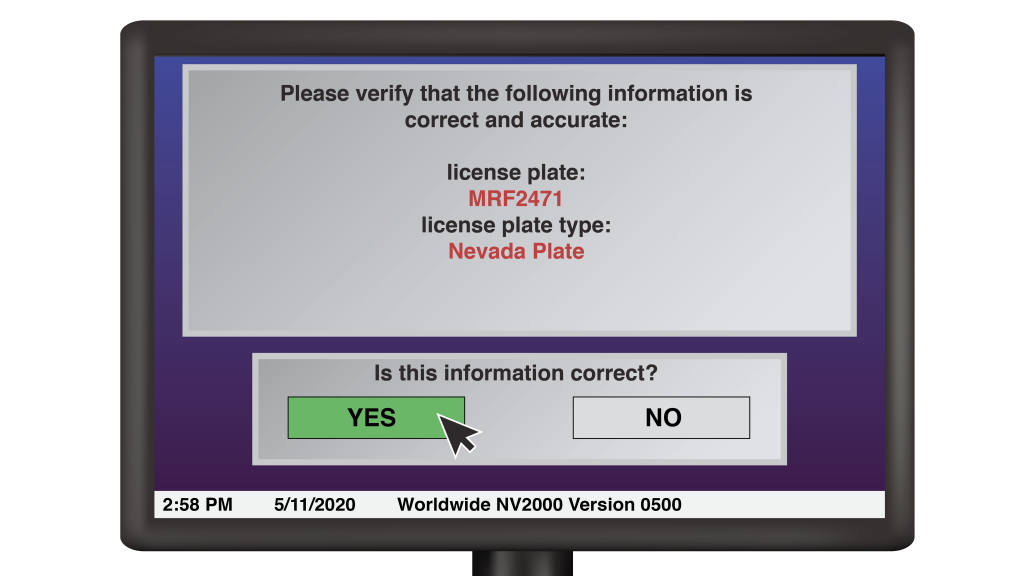
The next screen will ask you to select a license plate type for the vehicle. The majority of plates you will encounter will be Nevada plates. For any Nevada plate regardless of prefix or specialty status, select Nevada Plate. If the plate is from a US State or Territory other than Nevada, select Non-Nevada Plate. You will then be offered a list of Countries, States, and Territories to select from. Choose the appropriate option before inputing the plate characters. If the vehicle has no plates, select the No Plate option. If you select this option, you will be given a secondary list of options specifying why the vehicle has no plate. These include a vehicle which is being smogged by a dealership for sale to a third party, a vehicle which has come from out of state but has already ceded its plates, a vehicle that has no current plates issued for Nevada but has been issued a temporary operating permit by the DMV, and Other, which will encompass any scenarios that do not fall under those outlined above. Select whichever applies.
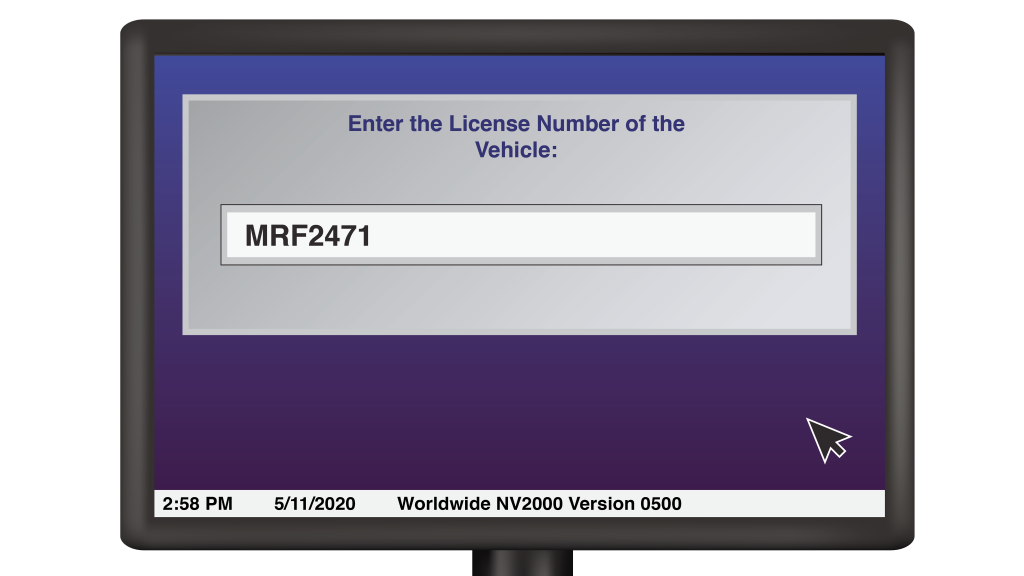
After selecting plate type you will be prompted to enter the license plate number of the vehicle. Verify the plate number from the rear license plate. Not all states require a front license plate, but all states require a rear plate. Sometimes, the license plate on the front of the vehicle will not match the one on the back. Always use the rear plate. When inputting the characters on the plate, be sure to include any prefixes necessary for speciality plates. While these are often printed directly on the plate, they may not be. Consult the master list provided to the shop of all specialty plates issued in Nevada to determine the correct prefix necessary for the specialty plate. You can also confirm this on the customer’s registration renewal card, if present and up to date. Do not enter any spaces, periods, stars, or other symbols. Once you have entered the license plate type and characters, another box will appear asking you to confirm that the information is correct. After verifying, select yes to continue. If you have entered a plate not currently registered to the vehicle, a warning box will appear informing you that the plate is not on file for the vehicle.
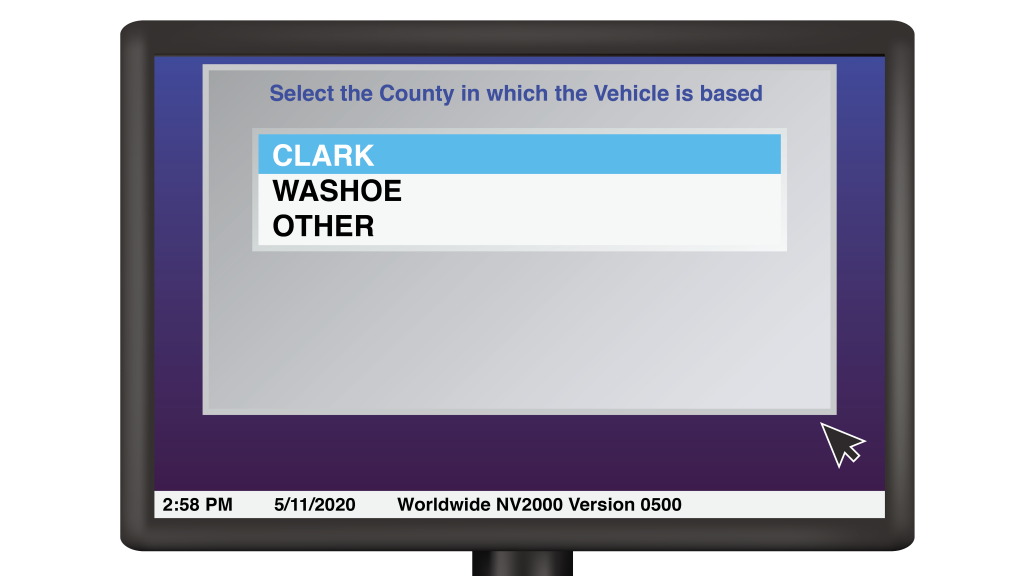
The next screen will prompt you to select which county the vehicle is going to be registered in. These will typically be Clark or Washoe County, as all other Nevada counties fall outside of the emissions program control area. If a smog is required for reasons other than registration and the customer is not a resident of Clark or Washoe Counties, or if the customer has out of state plates and no local legal address, input other.

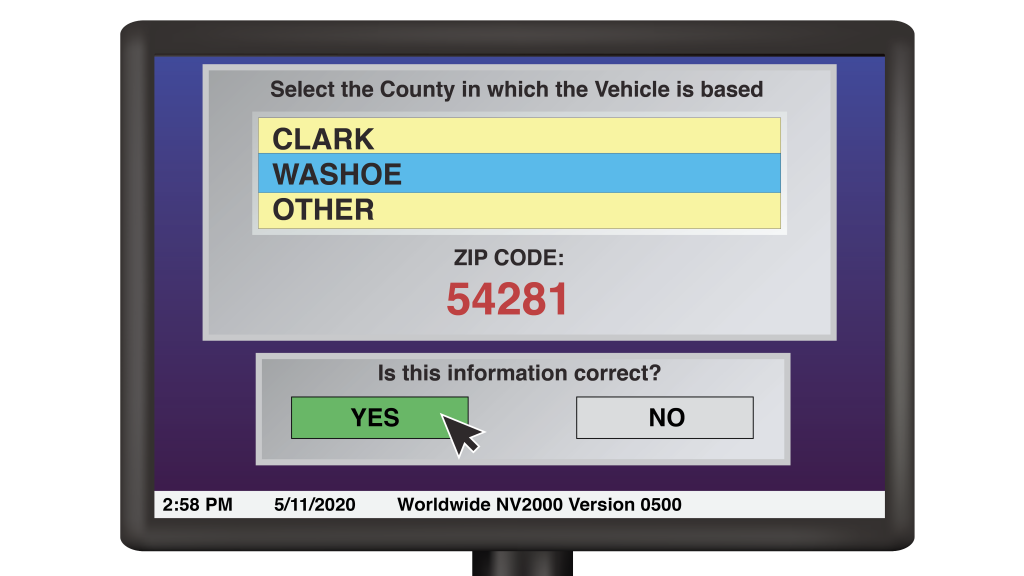
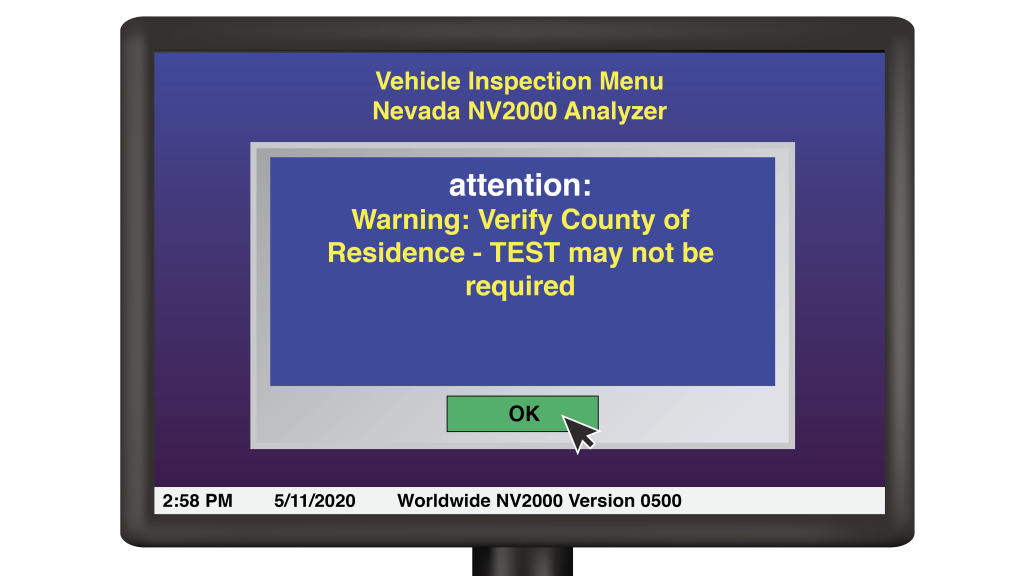
Next the analyzer will prompt you to input the customer’s zip code, ascertained during the six questions at the beginning of the smog. Confirm with the customer if you do not remember. After the Zip code is input, another screen will appear asking you to confirm both County and Zip Code. Ensure they are both correct before selecting YES. If you have entered Other with a Zip Code not requiring a smog, a prompt will appear asking you to ensure the customer understands that a smog is not required before continuing. If you have entered a Zip Code from outside the county you have selected, a warning box will state COUNTY/ZIP CODE MISMATCH. If the Zip Code entered falls in multiple counties, a warning box will inform you that a smog may not be required, and ask you to confirm with the customer that their address falls within the Emissions Program Control Area.

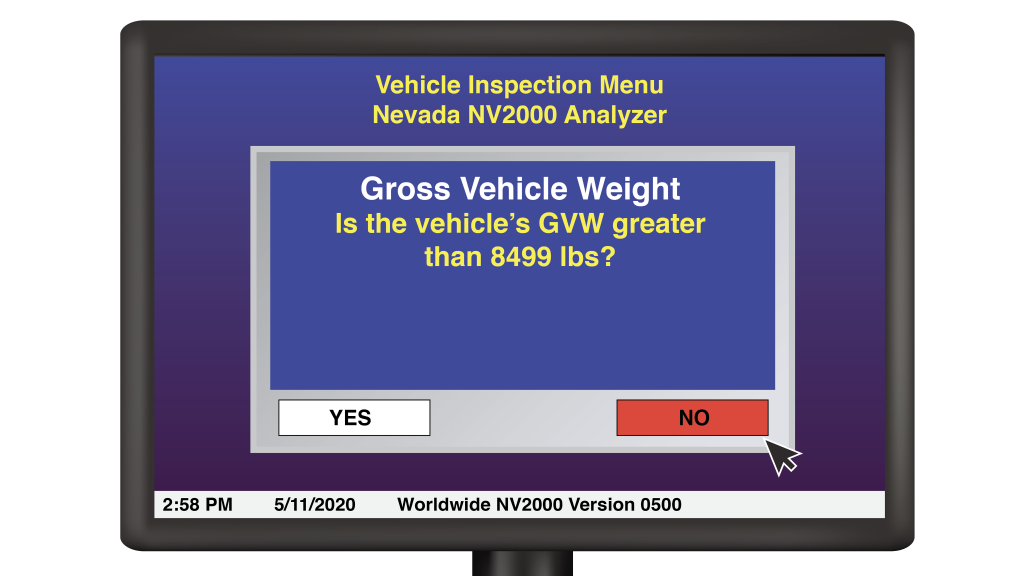
The next screen will ask you to determine if the Gross Vehicle Weight Rating of the vehicle being tested is greater than 8499 lbs. The vehicle’s Gross Weight is listed on the doorjamb on the vehicle information sticker. The GVWR is the maximum total weight of your vehicle when laden. This is as opposed to curb weight which is its base weight when not in use. The vehicle’s weight classification is listed on the catalyst sticker under the hood. For testing purposes, any vehicle with a GVWR of 8499 Lbs or less is considered light duty and tested as OBD-II where equipped. Any vehicle with a GVWR of 8500 Lbs or more is tested as a heavy duty, and subject to a tailpipe inspection. Determine the vehicle’s GVWR and select YES/NO accordingly. This will bring you to the next screen.
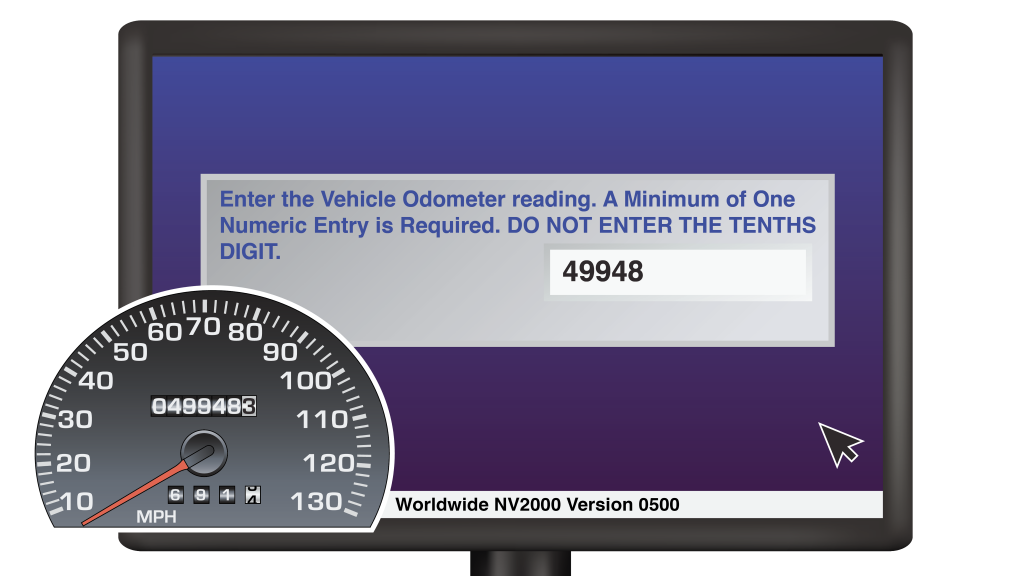
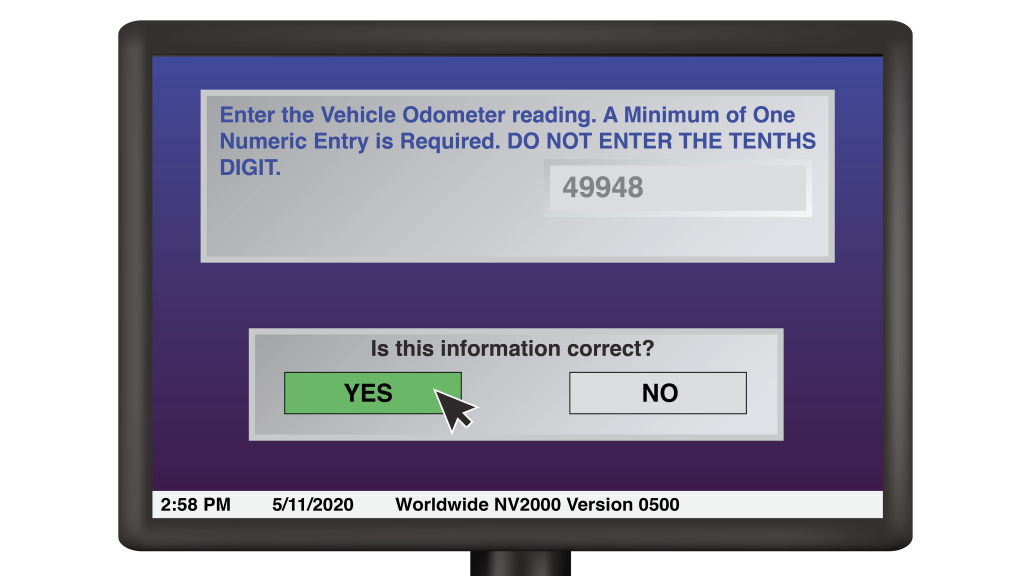
Next you will enter the Vehicle Odometer Reading. The odometer will be on the dash cluster. It may be either analog or digital. Oftentimes on newer vehicles, the Odometer will share a screen with other vehicle data displays. Sometimes you will have to cycle through them with a button or switch on the dashboard or steering wheel. If you find yourself unable to find the proper button, do not be afraid to ask the customer to bring up the odometer for you. However, it is important that you confirm the mileage yourself, and do not simply ask the customer to read it out for you. It is also important to ensure that the odometer is not set to the Trip function. Inaccurate mileage will result in an invalid VIR and the shop must provide a full refund or a re-test at no cost to the customer. You must enter the odometer reading exactly as it appears. Even if the odometer has clearly rolled over, only enter the stated mileage. Do not enter tenths or spaces. Make sure to only enter 0s, never Os. If the odometer is blank or inoperable, enter 1. After the entry of the Odometer reading, the analyzer will direct you to the OBD-II or tailpipe test profile depending on the information entered in the previous steps. This is where the OBD-II test begins.

After the odometer reading is entered, the communications screen will appear. This screen appears several times during the testing process, when thee analyzer communicates with the Vehicle information Database (VID). Do not move the analyzer when this screen is present, as it may cause damage while the information disc is in motion. The screen will inform you when communications are complete, and you may press continue. If you do not, the screen will automatically proceed after a preset interval.

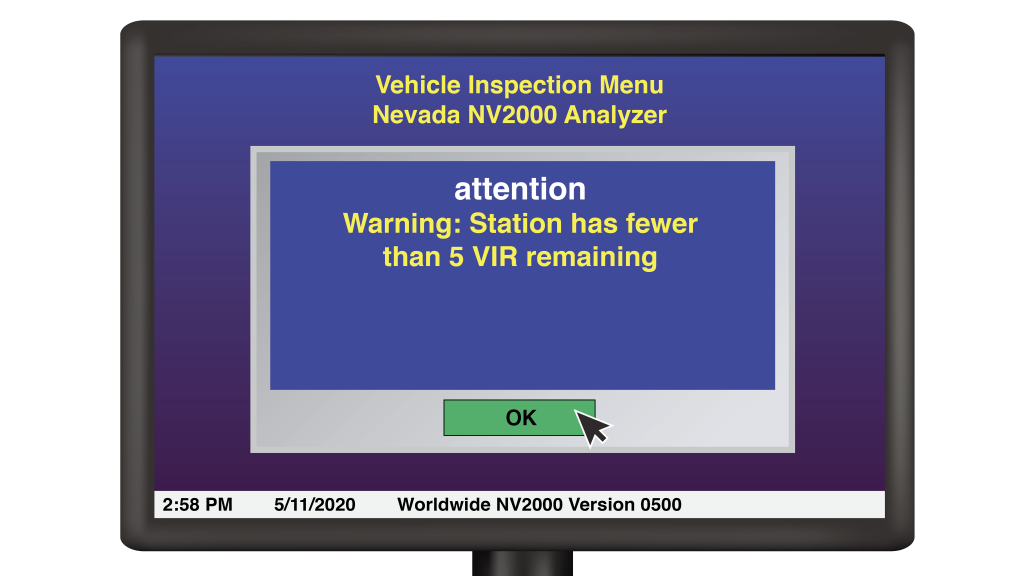
Following the communication screen, any relevant warning bulletins will appear in regards to the information you have input in the previous steps. These warning pop-ups will inform you of any inaccurate information or errors that may be present. These include a COUNTY/ZIP MISMATCH for the Zip Code entry, County of Residence- Test may not be required if the zip code entered includes areas outside the emissions control program area, a License Plate Not Currently On File for the license plate entry, Low VIR Inventory for the shop (appearing as fewer than 25, 10, and 5 VIRs respectively), and Current Passing Test On File. If the vehicle has a current passing test on file, a test was performed in the last 90 days. Inform the customer that they do not require a smog at present. If they do not wish to continue, abort the test. If they require a VIR copy, emissions lab personnel can re-print one at no charge. Another message may appear stating that the vehicle model year may not require inspection. This occurs when the vehicle is less than three registration cycles old and therefore smog exempt. The customer should be informed that they do not require a smog to register their vehicle.
Two further notices that may appear are the Priority Unread Bulletins message, and an Access Not Authorized message. If the Priority Unread Bulletins message appears, it means that there are unread messages from the DMV that should be accessed through the DMV portal on the Station Manager menu when the smog is completed as they may contain important information or updates about the analyzer. A message stating that you are not authorized to access the analyzer emissions inspection feature occurs if you input your MEI-prefix username or password incorrectly during your initial login to perform the inspection. Simply input them in the provided box to re-log in, being careful to verify that you are inputting them correctly. Remember: if you input your password incorrectly three times, you will be locked out, and will have to submit yourself in person to the DMV Emissions Lab with valid photo ID in order to invalidate your old password and be issued with a new one. You will be unable to perform inspections or log into any of the analyzer’s secure features before this time.
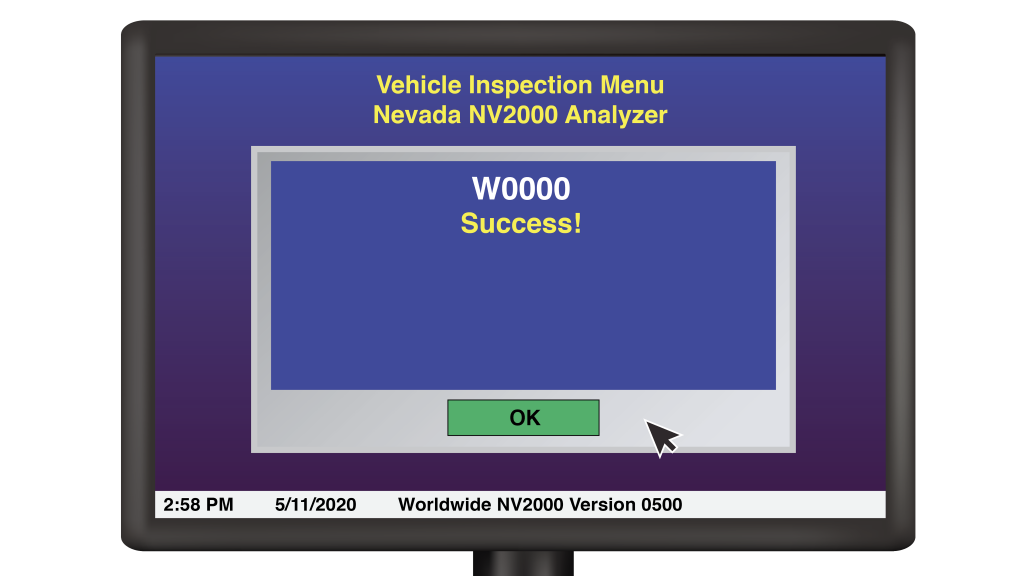
After acknowledging receipt of all bulletins, the success message will appear. Press OK and you will be logged into the Vehicle Data Screen.
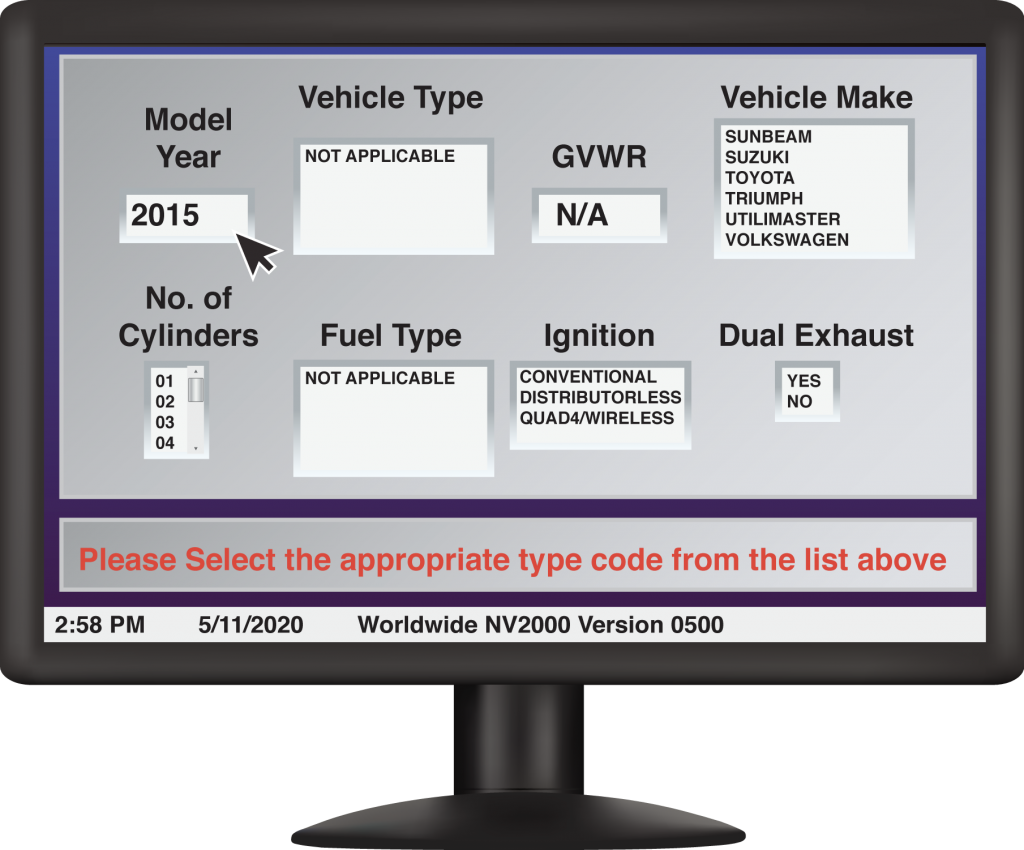
The next screen of the OBD-II emissions test is the Vehicle Data Screen. This screen will most likely be pre-populated by the Vehicle Information Database, so filling in many of these entries will be unnecessary. If the information is not pre-populated, confirm first that the VIN was entered correctly. An incorrectly entered VIN will often result in unfilled information. If the VIN is correct, it is possible that the VID simply has no record of the vehicle. In this case you must identify the make, model year, number of cylinders, ignition type, and exhaust type manually. In all cases regardless of pre-population, you will be asked to identify ignition and exhaust type. To identify the vehicle year, consult either the vehicle information sticker on the doorjamb, the catalyst sticker under the hood, or the 10th digit of the VIN in conjunction with the model year chart provided to the shop. Note that the VIN method does not apply to all pre-1980 vehicles.

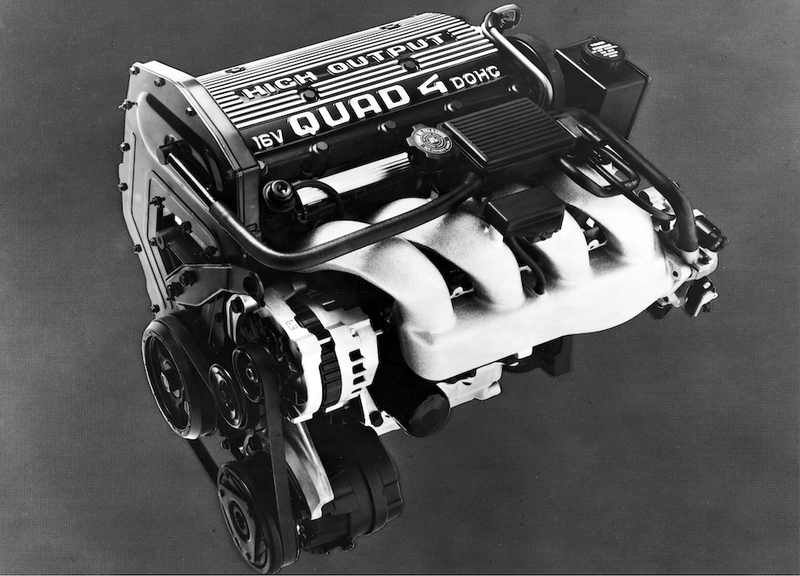
To identify the number of cylinders, observe the number of spark plugs/coil packs/fuel injectors, or consult the manufacturer’s label. To identify the type of ignition, identify if the vehicle has a distributor or not. Spark plug wires present at the cylinders are a good indicator that the engine is equipped with a distributor. If it is, you will select conventional. If it does not, you will select distributorless. Visible coil packs or distributorless ignition components will be a good indicator of this. If Quad4/Wireless Distributor is present, select this option.
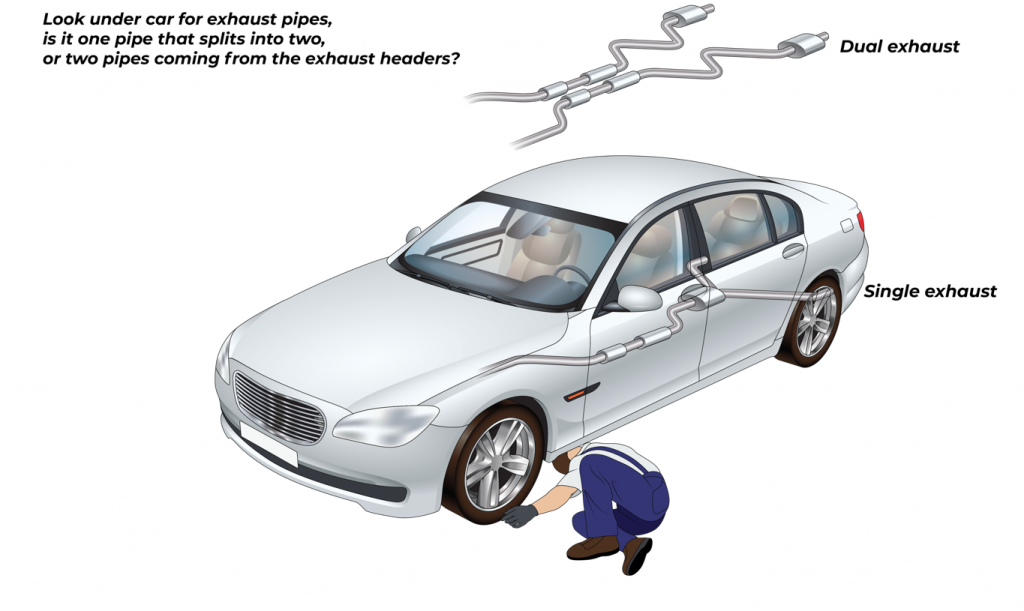
To identify the exhaust system, observe if the vehicle has single or double exhaust pipes. Technically, for a system to be truly dual, each stream of exhaust must be treated identically independently of the other, i.e. two separate exhaust manifolds to two separate catalytic converters to two separate mufflers with no mixing chambers, cross flow, or shared components. Some single exhaust systems will have a cosmetic splitter at the end to add twin exhaust pipes, and some dual systems will have shared components or a mixing chamber intermingling exhaust from the two streams. However, most technicians will find it easier to enter any setup with two exhaust pipes visible as dual exhaust. Vehicle type and fuel type will not be entered.
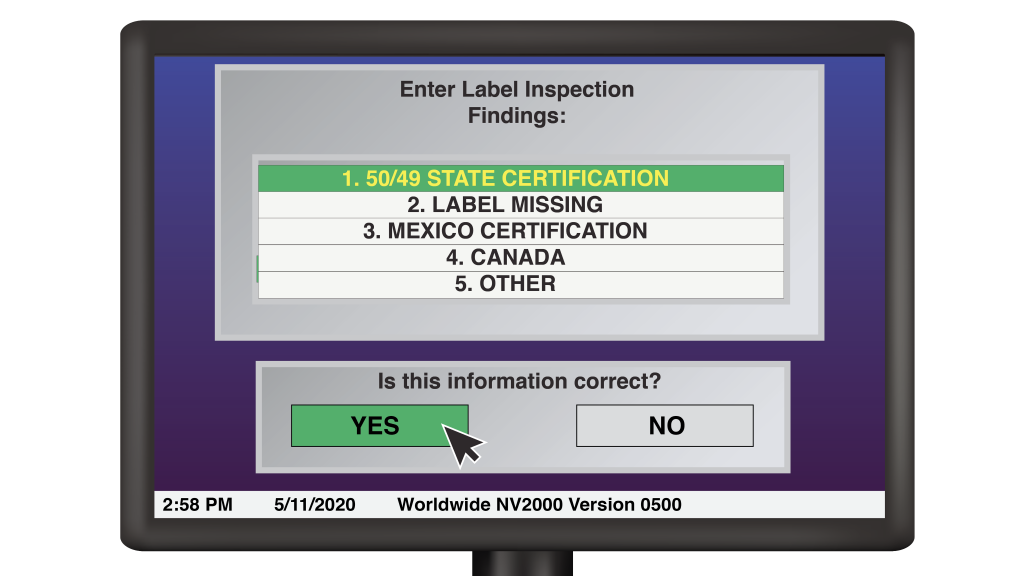
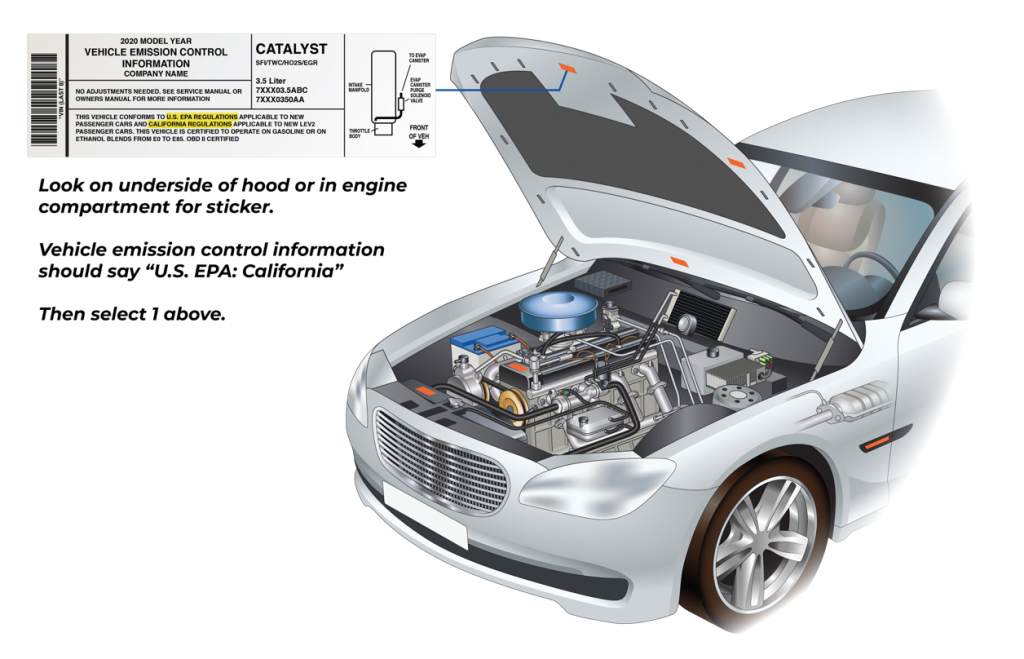
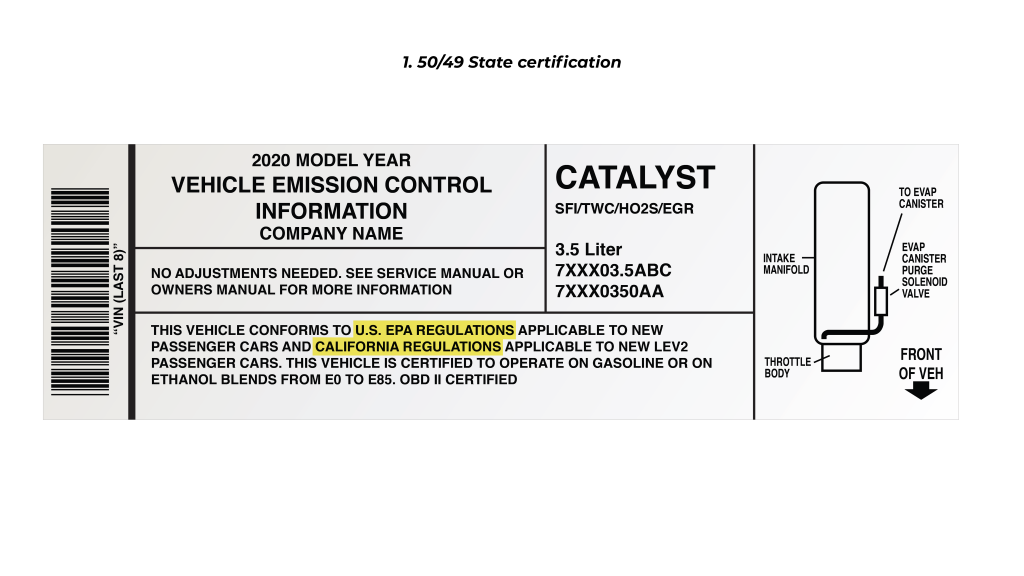
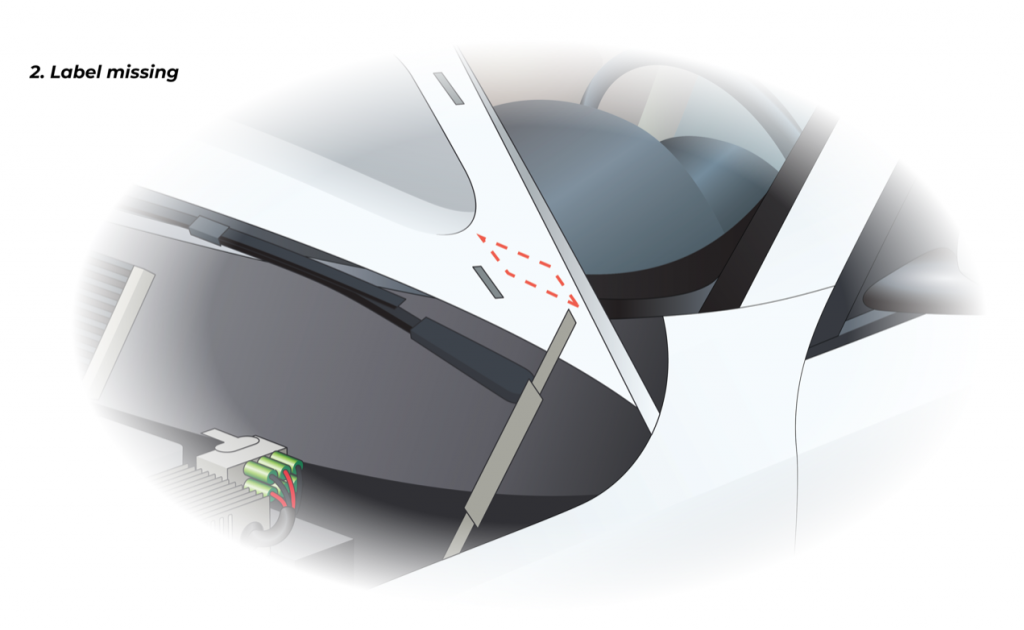
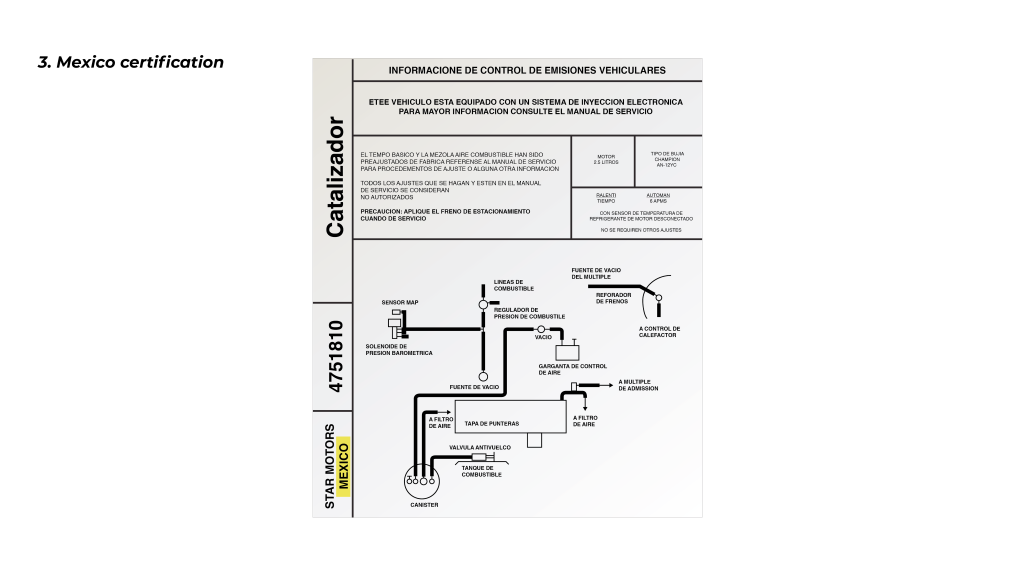
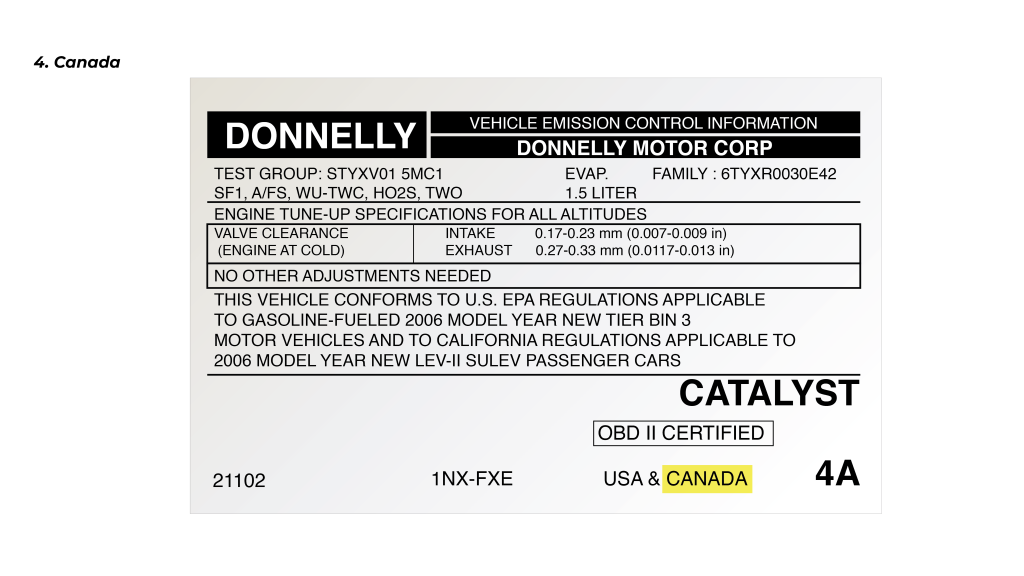
The next screen asks you to identify the certification status of the vehicle. The certification status of the vehicle is where the vehicle was certified to be sold. The certification status can be found on the Certification Statement Label located somewhere in the engine compartment, most often on the underside of the hood, around one of the strut tower housings, or on the air filter housing of the engine. If the certification statement says “Meets Federal and California Standards” or “Meets California Standards,” then select 50/49 Certification. Most vehicles are designed to meet California’s emissions standards, so this will be the correct choice in the majority of cases. If the label is damaged, partially or fully removed, or otherwise illegible or not present, select Label Missing. If the label states Mexico or Canada, choose options 3 or 4. If the label is in a foreign language, it is likely from another country. However, examine labels in Spanish or French to confirm that they are not from Canada or Mexico before choosing other. If the vehicle has a 17 digit VIN, call the emissions lab to confirm it is equipped to meet United States emissions standards. Once you have chosen the correct Label Inspection option, confirm that the information is correct by clicking the YES button.

After confirming the certificate statement selection, the next screen will ask you to confirm the odometer reading you entered earlier in the test. The reading will auto-fill. Simply observe that the odometer reading you put in previously was correct, and confirm it on the screen. If the Odometer Reading does not auto-fill, it is likely because the mileage input earlier in the inspection was lower than a previously recorded odometer reading from a prior inspection. If this number was not entered in error, press YES to continue to the next screen.